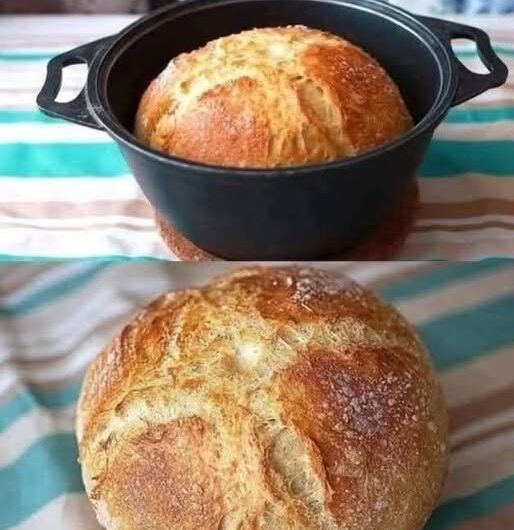
This easy no-knead sourdough discard bread is perfect when you have extra starter sitting in the refrigerator and want to turn it into a rustic, flavorful loaf. There is no complicated kneading, special shaping technique, or stand mixer required. A few simple ingredients, a little patience, and a Dutch oven are all you need.
The finished bread has a beautifully crisp crust, a soft and slightly chewy interior, and a subtle tang from the sourdough discard. It is wonderful for breakfast, sandwiches, toast, or simply serving warm with butter.
Ingredients
- 1 cup (240 g) sourdough discard, preferably unfed
- 1 ½ cups (360 g) warm water
- 3 cups (360 g) bread flour
- 1 cup (120 g) all-purpose flour
- 1 ½ teaspoons salt
- 1 tablespoon honey or maple syrup, optional
- 1 teaspoon instant yeast
The yeast makes this recipe especially reliable because sourdough discard alone may not contain enough active yeast to produce a consistently lofty loaf. If your discard is very active and bubbly, you can experiment with leaving out the commercial yeast, but the rising time will be considerably longer.
Equipment
- Large mixing bowl
- Wooden spoon or sturdy spatula
- Kitchen towel or plastic wrap
- Dutch oven with lid
- Parchment paper
- Wire cooling rack
Step 1: Mix the Dough
Begin by adding the warm water and sourdough discard to a large mixing bowl. Stir until the discard loosens and becomes mostly incorporated into the water.
Add the bread flour, all-purpose flour, instant yeast, and salt. If using honey or maple syrup, add it now as well.
Use a wooden spoon or spatula to mix everything together. Continue stirring until there are no large patches of dry flour remaining. The dough will look shaggy, sticky, and somewhat messy. That is exactly what you want.
Do not add large amounts of extra flour simply because the dough feels sticky. A wetter dough helps create a lighter, more open crumb.
Step 2: Rest the Dough
Cover the bowl with a clean kitchen towel or plastic wrap and let the dough rest at room temperature for about 30 minutes.
This short rest allows the flour to absorb the water and gives the gluten time to begin developing naturally.
After 30 minutes, you can perform a few gentle stretches and folds. Wet your hands, grab one side of the dough, stretch it upward, and fold it toward the center. Turn the bowl and repeat three or four times.
This takes less than a minute and helps strengthen the dough without traditional kneading.
Cover the bowl again.
Step 3: Let It Rise
Leave the dough at room temperature for approximately 2 to 4 hours, depending on how warm your kitchen is.
The dough does not necessarily need to double in size. Look for visible bubbles, a slightly domed surface, and an overall increase in volume of roughly 50 to 75 percent.
If your kitchen is cool, the dough may require additional time. If it is particularly warm, it may rise much faster.
For extra flavor, you can also place the covered dough in the refrigerator after the initial rise and let it ferment overnight. Cold fermentation develops a deeper sourdough character and makes the bread convenient to bake the next day.
Step 4: Shape the Loaf
When the dough has risen, lightly flour your work surface. Carefully turn the dough out of the bowl.
Try not to aggressively punch the dough down because you want to preserve some of the air bubbles that have developed.
Gently fold the edges toward the center, creating a rough round shape. Turn the dough over so the seams are underneath.
Using lightly floured hands, gently rotate the dough against the work surface to create a smooth, round loaf.
If the dough is extremely sticky, lightly flour your hands rather than adding excessive flour to the dough.
Step 5: Final Rest
Place a sheet of parchment paper on your counter or inside a bowl. Set the shaped dough on the parchment.
Cover it loosely with a towel and let it rest for approximately 30 to 60 minutes.
Meanwhile, place your Dutch oven and lid inside the oven.
Preheat the oven to 450°F (230°C). Allow the Dutch oven to heat for at least 30 minutes so it becomes thoroughly hot.
Preheating the Dutch oven is important because the intense heat helps the loaf rise quickly when it first enters the oven.
Step 6: Score the Bread
Once the oven and Dutch oven are fully heated, carefully remove the Dutch oven.
Using the parchment as a sling, transfer the dough into the hot pot.
Use a sharp knife or bread lame to make one deep slash across the top of the dough. You can make a simple line, cross, or decorative pattern.
Scoring gives the expanding bread a controlled place to release steam during baking.
Be extremely careful when handling the hot Dutch oven.
Step 7: Bake
Place the lid on the Dutch oven and carefully return it to the oven.
Bake covered for 25 minutes.
The covered environment traps steam released from the dough. This steam helps produce the beautiful crisp crust associated with artisan-style bread.
After 25 minutes, remove the lid.
Continue baking for another 15 to 20 minutes, or until the loaf is deeply golden brown.
If you prefer a softer crust, remove the bread slightly earlier. For a darker, crunchier crust, allow it to bake a few additional minutes while watching carefully.
The bread should sound hollow when gently tapped on the bottom.
Step 8: Cool Completely
Remove the finished loaf from the Dutch oven and transfer it to a wire rack.
Although it may be tempting to slice it immediately, allow the bread to cool for at least one hour before cutting.
Cooling allows the interior structure to finish setting. Cutting too early can cause the crumb to become gummy or compressed.
Once cool, slice the bread with a serrated bread knife.
Helpful Tips for Success
Use the right discard
Sourdough discard can vary significantly in age and consistency. A discard that has been refrigerated for several days will generally have a stronger tang than freshly fed starter.
A grayish liquid, called hooch, can appear on top of older discard. Pour it off or stir it back in according to your preference. If the starter has developed fuzzy mold, unusual colors, or a rotten smell, discard it rather than using it.
Don’t worry about sticky dough
No-knead bread dough is supposed to be soft and sticky. Adding too much flour can produce a dense loaf.
Use wet or lightly floured hands when handling it.
Adjust the water if necessary
Different flours absorb different amounts of water. If your dough looks unusually dry after mixing, add water one tablespoon at a time.
If it resembles a very loose batter rather than a sticky dough, add a small amount of flour.
Don’t rush the rise
Temperature greatly affects fermentation. A warm kitchen can dramatically shorten rising time, while a cool kitchen can make the process much slower.
Use the appearance of the dough as your guide rather than relying solely on the clock.
Flavor Variations
This basic recipe is delicious on its own, but you can easily customize it.
For garlic-herb bread, add one teaspoon of garlic powder and a tablespoon of dried Italian herbs.
For cheesy bread, fold in ¾ cup of shredded cheddar, Parmesan, or mozzarella during the final shaping.
For a savory loaf, add chopped rosemary, thyme, olives, or sun-dried tomatoes.
You can also make a slightly sweeter breakfast loaf by adding two tablespoons of honey along with cinnamon and a handful of raisins.
Storage
Store the cooled loaf at room temperature in a paper bag or bread box for up to three days. Avoid storing crusty bread in an airtight plastic bag immediately after baking because trapped moisture can soften the crust.
For longer storage, slice the bread and freeze it in a well-sealed freezer bag. Individual slices can be removed as needed and toasted directly from frozen.
Serving Ideas
This sourdough discard bread is incredibly versatile. Serve warm slices with butter and jam for breakfast, use it for grilled cheese sandwiches, or toast it and top it with avocado and eggs.
It also pairs beautifully with soups, stews, pasta dishes, roasted vegetables, and hearty salads.
For a simple snack, toast a thick slice and spread it with butter, cream cheese, or your favorite nut butter.